Sewer problems are never fun to deal with, but sometimes they’re unavoidable. Once you know there’s an issue, it’s important to act quickly and address the problem before it causes major damage. In some cases, you may need to turn to sewer excavation to get the job done.
But what exactly is it?
Sewer excavation is a process in which a trench is dug or a hole is created in the ground to access the sewer line. This is necessary when the sewer line is blocked or damaged deep below the surface, making it impossible to reach it without digging up the surrounding earth. It can also be a necessary step in replacing or repairing damaged pipes.
Though sewer excavation isn’t always ideal, it can be necessary to get the job done right. Traditional methods of excavation involve digging a trench to access the sewer line directly.
You might need sewer excavation if you have a clogged or damaged sewer line that can’t be reached through other methods.
Common causes of sewer problems include:
impeding tree roots
aging pipes
blockages from debris or foreign objects
Sometimes, only a small section of the pipe needs to be excavated, while other times, a larger area might need to be dug up. It’s important to work with a professional who can assess the situation and determine the best course of action.
When dealing with a sewer problem, it’s important to act fast. Any delay can cause the issue to worsen, leading to more extensive and expensive repairs.
That’s why it’s important to have a professional on hand who can identify the issue and take quick action. Even if you’re not sure if sewer excavation is necessary, it’s important to get the opinion of a professional.
Valley View Excavating provides reliable and efficient sewer excavation services for residential and commercial customers in Connecticut. While we are located in Plainville, CT, we provide services in the larger Connecticut area, such as Southington, Bristol and New Britain.
When Should You Hire a Connecticut Sewer Excavation Company?
When you experience a clog or sewer damage, it’s important to hire a professional for sewer excavation services.
Our experienced technicians will thoroughly assess the problem and provide the best possible solution.
In some cases, the pipe may be able to be cleared without excavation, while in other cases, excavation may be necessary. We can help you determine the best course of action for any sewer line issue.
Why Choose Us for Your Sewer Excavation Project?
When you choose Valley View Excavating for your sewer excavation project, you can trust that the job will be done right. We are owned and managed by Adam Zadrozny, and he is on-site at all times to ensure that our services meet your expectations.
Unlike some larger companies, we offer a more hands-on experience, so you can rest assured that your sewer excavation project will be completed quickly and efficiently.
If you’re in need of sewer excavation services in Plainville, CT, contact Valley View Excavating today for a free quote!
FAQ
How deep are most sewer lines buried?
Most sewer lines are about six to eight feet deep, but this does not mean that excavation contractors won’t have to dig deeper to reach the problem area or to lay new pipes. In some cases, the excavation might have to be deeper due to obstructions or bedrock.
How do you trench a sewer line?
Trenching sewer lines involves digging a narrow and deep path that spans the length of the pipes. The depth of the trench depends on the pipe’s size, the soil’s composition, and the local codes. The excavators then remove the dirt or debris and replace the soil after the repairs are done.
Who are the best sewer excavation contractors near me?
Valley View Excavating LLC is one such top-rated and professional contractor in the area. We specialize in sewer excavation, septic system repair, residential and commercial services, and more.
What is a sewer excavation cost?
The cost of sewer excavation varies based on several factors such as its depth, location, type of excavation needed, and the contractor. Make sure you get an estimate to ensure you understand all the costs associated with your sewer line excavation project.
Connecticut is full of all kinds of diverse terrain, unique landscapes, and of course, plenty of quirks. As you might expect, quality excavation work requires the right machinery and equipment to get the job done safely, efficiently – and on budget.
At Valley View Excavating, we have state-of-the-art equipment and machinery to tackle any excavation project. From foundation excavation, driveway excavation, sewer line excavation, to slope stabilization, we have experience in doing it all.
We specialize in a range of Connecticut excavation services, including sewer line excavation, slope stabilization, driveway excavation and road grading, foundation excavation, and septic installations. Our years of experience have given us the expertise to handle any excavation projects with ease and professionalism.
Connecticut is our home, and we’re proud to serve our local communities. Our service areas extend to Southington, New Britain, Bristol, and beyond – through much of Hartford County, in fact.
Choose Valley View Excavating LLC for all your excavation needs in Connecticut. We’re committed to providing exceptional excavation services that exceed your expectations.
Contact us today for a free quote, and let’s get started on your project here in the Constitution State.
Top Connecticut Excavation Services
Looking for top-notch excavation services in Connecticut? Look no further than Valley View Excavating, LLC!
We offer a wide range of residential and commercial excavation services to meet your needs, from site preparation and foundation excavation to septic system installation and much more.
Residential Connecticut Excavation Services
Valley View Excavating, LLC is your go-to excavation contractor for all your residential excavation needs in Connecticut.
With over a decade of experience, we specialize in site preparation for new home construction, foundation excavation for both new construction and home additions, basement excavation for finishing or waterproofing, and septic system installation for homes that are not connected to a public sewer system.
We understand that every residential excavation project is unique, and we approach each one with the utmost precision and care. Our team is equipped with state-of-the-art machinery and equipment to handle any size excavation project. We take pride in our work and strive to maintain the highest standards of safety and quality.
In addition to our excavation services, we also offer drainage solutions to prevent water damage and erosion on your property. We take into consideration the slope of your property and ensure proper drainage to prevent any potential water damage.
At Valley View Excavating, LLC, we understand that excavation work can be daunting for homeowners, but we’re here to help.
Commercial Connecticut Excavation Services
If you’re in need of commercial excavation services in Connecticut, Valley View Excavating, LLC is the company to call. Our team has years of experience in site development, grading, and leveling for construction projects. We also specialize in underground utility installation, specifically for water and sewer lines.
When it comes to beautifying your commercial property, we offer exceptional hardscaping services to enhance the aesthetics of your space. Our team can create beautiful retaining walls, add new garden bed areas, and even install pavers or a new patio.
In addition to our commercial excavation services, we also offer erosion control measures to help protect the environment and prevent damage from storms and heavy rain. We take great pride in ensuring that our work is performed to a high standard of safety and quality.
Your business is your baby – and we want to make sure you’re well taken care of with our extensive suite of commercial excavation services here in Connecticut.
Our Approach to Connecticut Excavation Projects
At Valley View Excavating, LLC we take a thorough approach to Connecticut excavation projects.
We understand that excavation work can be a daunting task, which is why we strive to provide our customers with a stress-free experience. Our team is dedicated to communicating with you every step of the way to ensure that your project runs smoothly and is completed on time.
Our state-of-the-art equipment is meticulously maintained, and our team is fully trained to keep safety at the forefront of every job. When you work with Valley View Excavating, you can trust that your project will be completed quickly, safely, and efficiently.
We’re also committed to providing our customers with competitive pricing. We understand that every project is unique, so we offer customized pricing to fit within your budget.
We stand behind our work and offer an extensive customer satisfaction guarantee. Our team is committed to providing the highest level of service to our customers, and we are confident that you will be satisfied with the quality of our work and professionalism.
Contact Us Today for Your Next Connecticut Excavation Job
If you’re in need of excavation services in Connecticut, look no further than Valley View Excavating, LLC. Our team of experienced contractors has been serving both residential and commercial customers since 2007 and we take pride in our work.
We understand that different projects require different solutions, which is why we take a personalized approach to each job we take on here in Connecticut.
We are located in Plainville, Connecticut, but our service area extends throughout Hartford County, including Southington, New Britain, Bristol, and beyond. We are a trusted contractor of the town of Plainville, Connecticut, having completed municipal sewer work for them for many years.
So why choose Valley View Excavating for your excavation needs? In addition to all the reasons outlined above, our many five-star reviews should speak to the satisfaction of our clients. We are dedicated to providing top-notch service and want to make sure that every project we complete exceeds our clients’ expectations. We invite you to view our excavation project gallery to see firsthand the quality and broad extent of our work!
Contact us today for a free quote on your next excavation or construction project.
Whether you’re in need of sewer line repair, slope stabilization, foundation excavation, or any other excavation service here in Connecticut, we’re ready to partner with you to get the job done right.
Don’t trust your excavation needs to just anyone – choose Valley View Excavating, LLC. We’re the best excavation contractors Connecticut has to offer.
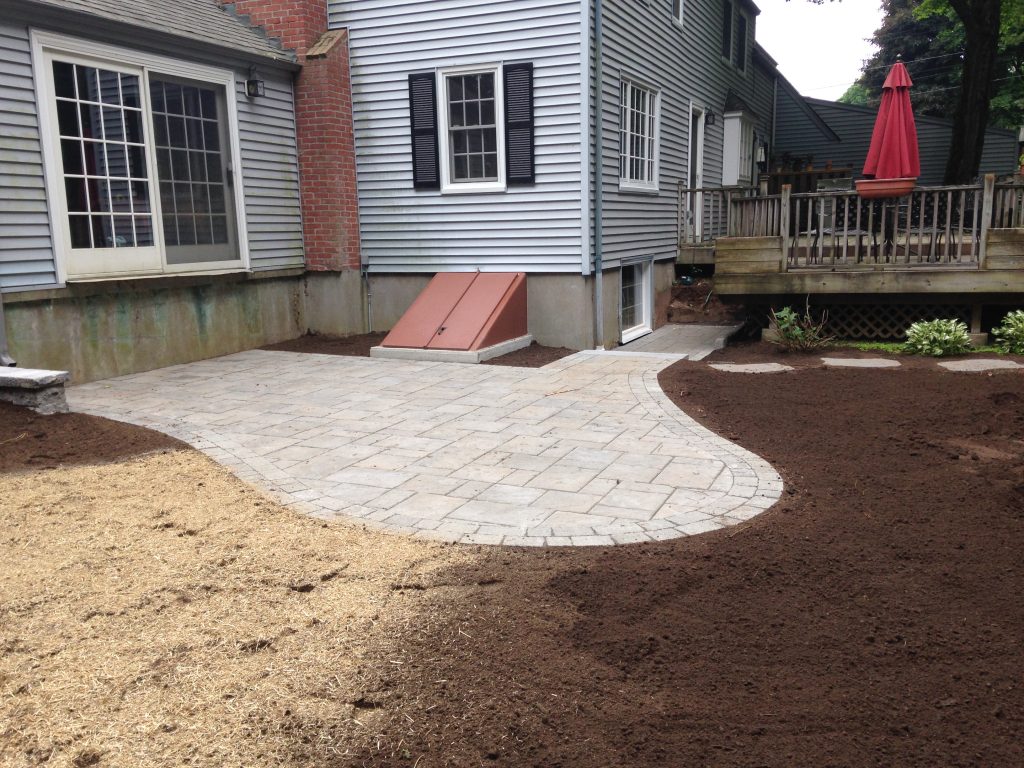
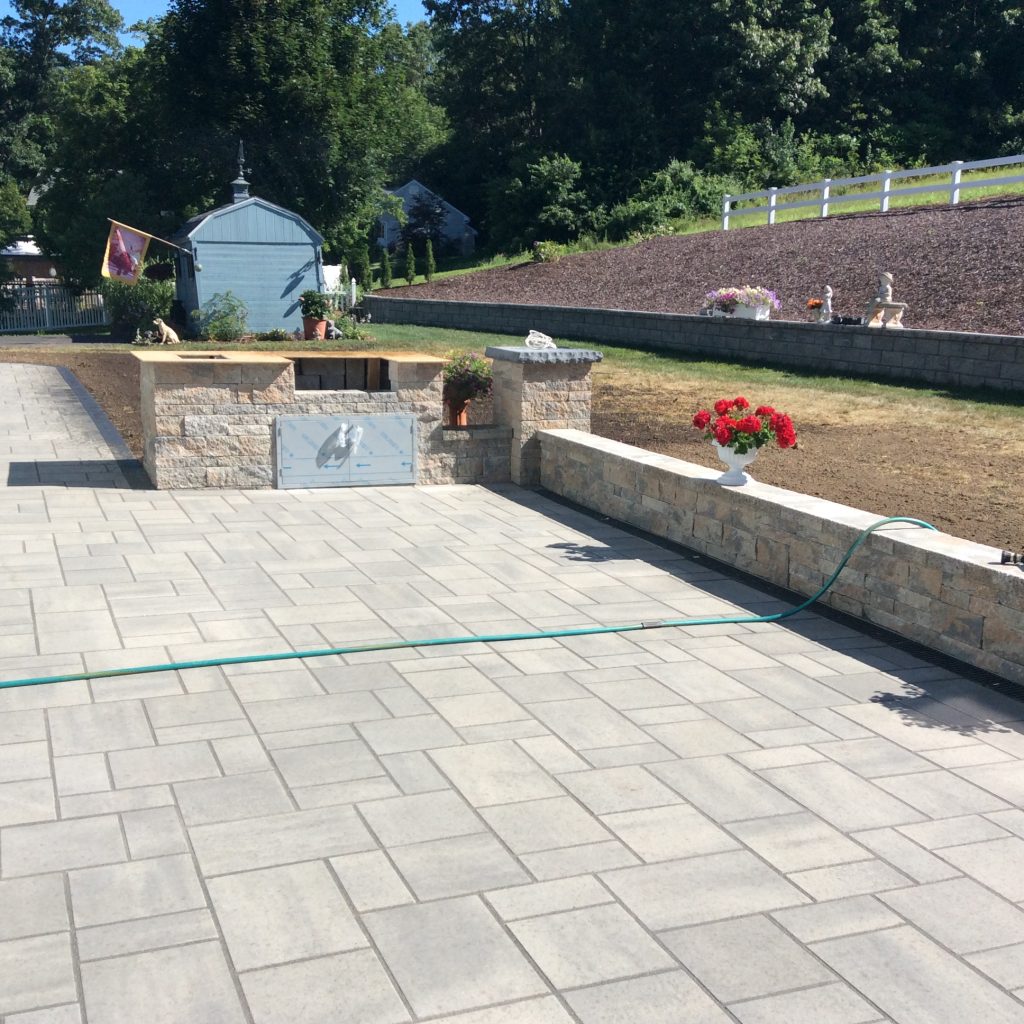
Are you planning to have a beautiful outdoor space where you can relax and entertain guests?
Installing patio pavers is an excellent way to achieve that! You might think that installing patio pavers is a difficult task, but with the right guidance, it becomes a fun and easy project.
In this blog post, we’ll take you through the step-by-step process of installing patio pavers. Whether you’re a DIY enthusiast or planning to hire a landscaper, you’re sure to find this guide helpful.
Why Choose Patio Pavers?
Are you looking to upgrade your outdoor living space? Perhaps you want to create a relaxing area where you can entertain guests, or maybe you want to improve the overall aesthetic appeal of your property.
Whatever your reason may be, one popular option to consider is patio pavers. Patio pavers are versatile, low-maintenance, and offer a host of benefits.
One of the top reasons to choose patio pavers is their durability. Pavers are incredibly strong and can withstand heavy weights and harsh weather conditions. Unlike some other materials that may crack or warp over time, pavers maintain their shape and structure for years to come.
Not only that, but patio pavers are very versatile and can be used in various areas of your outdoor living space. They can be used to create a beautiful patio area, walkway, or driveway.
With patio pavers, you can create a cohesive aesthetic for your outdoor space. With numerous styles, colors, and textures available, you can easily find patio pavers that match the look and feel of your home. Plus, you can get creative with the design and pattern of your pavers, truly making them one-of-a-kind.
Unlike natural stone or wood, pavers don’t require sealing or staining. Plus, any repairs or replacements are typically simple and cost-effective. Simply remove the damaged paver and replace it with a new one. This makes patio pavers an excellent option for busy homeowners who want to enjoy their outdoor living space without added stress or upkeep.
Finally, unlike some other outdoor flooring solutions, pavers offer excellent traction, even when wet. This makes them ideal for pool areas, outdoor kitchens, and other areas where slipping and falling could be a hazard.
How to Install Patio Pavers
Looking to jazz up your backyard and create a perfect outdoor oasis for you and your family? Putting down some patio pavers could be a game-changer for your outdoor living area. It’s an excellent way to create a cozy and intimate space for outdoor parties or even just a quiet retreat for your morning coffee.
Here is a step-by-step guide to help you install your patio pavers and create a beautiful outdoor space that you’ll love for years to come!
1. Take Some Measurements
The first and foremost step in installing your patio pavers is to measure and plan the area where you want to install them. It helps if you have a clear idea of the size and shape of your designated patio space. This step is where you’ll need to make a decision about sizing, shape, and design of your patio pavers.
Once you’ve measured the area, you can use graph paper or sketch out a plan to visualize all the elements of your patio project. Remember, as the old saying goes, measure twice and cut once! Or in this case, measure twice and lay patio stones once.
2. Check With the Local Utility Companies
Once you have a plan in place, contact your local utility companies before starting to make sure that there are no underground pipes or lines in the area where the paving stones will be installed.
Be sure to get the all-clear from the utility companies like gas, water, or electricity, as installation damages to the existing pipes could be a costly affair, not to mention dangerous.
3. Choose the Pavers
Choosing the right type and color of patio pavers that match your home exterior is the next big decision you need to make. Before selecting your pavers, consider material types like concrete, brick, or natural stone that come in various styles like interlocking, vintage, or modern.
You can also opt for pavers with a textured surface for better traction and durability. Once you’ve chosen your ideal pavers, be sure to order an extra 5-10% of what you need to ensure you have enough for replacements or waste.
4. Mark the Area With Gradestakes or Marking Paint
Now it’s time to mark the area where you’ll be installing your patio. You can use gradestakes or marking paint to outline the area where you’ll be digging.
5. Remove Grass and Soil
Before you can start laying pavers, you’ll need to remove the grass and soil from the area that you’ve marked. Be sure to dig down deep enough to allow for proper drainage. This step can be labor-intensive, so don’t hesitate to hire a professional landscaper to do it for you.
6. Excavate and Level the Installation Area
After you have removed the grass and soil, it’s time to excavate and level the installation area. You’ll want to make sure that the area is level – you can use a string level or a transit level to do so.
7. Add the Paver Base
A paver base is a layer of crushed stone that is placed beneath the pavers to provide stability to the patio. The base material should be chosen based on the soil composition in your area. Clay soil requires a more robust base, and sandy soil requires less because it stabilizes quickly.
Crushed stone, gravel, and stone dust are some of the materials that you can use as a paver base material. Make sure that the base is leveled before proceeding.
8. Install the Edge Restraints
Around the perimeter of the patio area, you will need to install edge restraints. Edge restraints are used to keep the pavers from moving beyond the limits of the patio. There are several materials available for edge restraints, including concrete, plastic, and metal.
The edge restraint should be installed in a two-to-three-inch-deep trench alongside the patio area and nailed to the base material. Make sure the restraints are level with the base material.
9. Add and Level Paver Sand
The next step is to add and level the paver sand. Paver sand is a coarse, granular material used to fill in the gaps between the pavers. It is essential to use the right type of sand. Concrete sand or washed builder’s sand are the best options.
Avoid using beach sand because it is often too fine, which can make it tough for the pavers to lock-in.
The sand should be applied to a depth of one inch over the base material. Measure and mark the sand level to make sure it is consistent throughout the area. Then, using a vibrating plate compactor, compact the sand layer.
10. Lay the Paver Stones
Now it’s time to start laying your paver stones. Start at one corner of your patio and work your way outward. Be sure to leave a small gap between each paver stone to allow room for expansion and contraction due to changes in weather. Use a level to ensure that each stone is resting evenly on the gravel base.
11. Cut Your Pavers As Needed
As you get closer to the edges of your patio, you may need to cut some of your pavers to fit properly.
Use a saw or chisel to make the necessary cuts. Be sure to wear protective goggles and gloves during this step. Once your paver stones are in place, you can add edging if necessary to keep them from shifting over time.
12. Tamp the Pavers into the Sand
When all the pavers are laid out, it’s time to tamp them into place. This process ensures that the pavers are leveled and secure. Use a tamper or a compactor to tamp the pavers onto the sand. This step will prevent the pavers from shifting or moving once they are locked in place.
13. Spread Paver Sand Again
Once the pavers are tamped into place, spread paver sand on top of them. The sand fills any gaps between your pavers and makes them even more secure. Spread the sand evenly over the surface, make sure it covers all the joints between pavers.
14. Sweep Sand Into the Joints
The final step is to sweep the sand into the joints. This step will lock the pavers together and prevent them from shifting or moving. Use a broom to sweep the sand into the joints carefully.
Sweep off any excess sand from the top and make sure the sand is evenly distributed throughout. This process ensures a finished look and stability.
15. Seal the Pavers
Apply a joint sand between the pavers, and then run a compactor over the top to help settle the sand in place. This will help prevent weeds from growing between the joints of the pavers. Once the sand is in place, apply a sealant over the entire surface of the pavers. This will help protect the pavers against weather damage and stains.
Basic Maintenance for Paver Patios
As we’ve established, a paver patio can add an attractive and functional outdoor living space to your property.
However, just like any other outdoor feature, it requires regular maintenance to keep it in top condition. Neglecting to perform basic maintenance tasks can lead to damage and costly repairs down the road.
Here are some tips.
Keep the Surface Clean and Clear of Debris
One of the most important maintenance tasks for your paver patio is to keep its surface clean and free of debris. Debris, such as leaves, dirt, and branches, can trap moisture on the surface, leading to the growth of algae, mold, and other types of vegetation.
This can not only make your patio look unsightly but also cause it to become slippery and dangerous to walk on. To avoid such issues, make sure to sweep the surface regularly and remove any weeds that may appear in gaps between pavers.
Seal the Pavers
Sealing your pavers is an essential maintenance task that can help prevent damage and keep them looking like new. Sealing creates a protective barrier on the surface of the pavers, preventing moisture from penetrating and stains from forming.
It can also enhance the color of your pavers, making them look more vibrant. It is generally recommended to seal your pavers once every two to three years, depending on the level of foot traffic and exposure to the elements.
Address Any Hardscape Issues
If you notice any issues with your paver patio, such as cracks, uneven pavers, or settling, it is important to address them as soon as possible. These issues can compound if left untreated, leading to larger and more expensive repairs down the road.
Small cracks can be filled with polymeric sand or patching compound, while more significant damage may require the removal and replacement of affected pavers.
Use Appropriate Care Products
Using the right products to care for your paver patio is essential in preventing damage and keeping it in good condition. Harsh chemicals such as bleach or ammonia should be avoided as they can cause discoloration and deterioration of the pavers.
Instead, opt for gentle cleaning solutions such as a mixture of vinegar and water or a specialized paver cleaner. Always follow the manufacturer’s directions when using cleaning products.
Can You Put a Fire Pit or Hot Tub on a Paver Patio?
Before installing a fire pit or hot tub on a paver patio, you’ll want to make sure that the patio can handle the weight and capacity.
A professional landscaper can help you determine if your chosen patio spot can handle the weight of a hot tub or fire pit. You may need to add more support with thicker pavers, a base of crushed rock, or additional framing.
Keep in mind that hot tubs are the heavier of the two due to their size and the amount of water they hold.
Also, before any construction on your outdoor living area, make sure you check with your local zoning commission for any regulations or restrictions. Many local ordinances dictate specific placement and dimensions for outdoor structures.
Some require fence enclosures or require permits for projects like hot tub and fire pit installation. A professional landscaper will be familiar with these regulations and can help ensure your project adheres to the rules.
Should You DIY Your Patio or Hire it Out?
Creating an outdoor living space in your backyard brings your living area to life. It acts as a great place to unwind, host a party or spend quality time with family.
As you now know, installing a patio is a great way to do this.
If you want a high-quality patio without going through the hassle of a DIY project, then hiring a professional landscaper is your best bet.
A professional landscaper has the necessary experience and knowledge to install a functional and aesthetically pleasing patio. They know all the landscaping techniques, ensuring that there is no damage to drainage pipes, electric wiring, and the surrounding nature.
Hiring an expert can also save you both money and time, as they provide a guaranteed installation, reducing maintenance costs in the long term.
Not sure where to turn? If you live in the Plainville, CT, area, then Valley View Excavating is the best choice. With years of experience in the industry, Valley View Excavating can deliver exceptional results and help you create the outdoor living area of your dreams.
Why take up the burden of a complicated project when you can sit back, relax, and just enjoy the finished product instead? Contact Valley View Excavating today and get started on creating your perfect patio!